Click to use Nova Volume Indicator
This is the most up-to-date and complete breakdown of Nova. It includes almost everything I use today - from prep to execution - so you can see exactly how I trade it. This post replaces anything I wrote on the first page but you can still use that information too! & yes I did use our little tech friend to structure my write up as it was a mess and full of information haha.
1. What is Nova?
Nova is a volume-based trend system that combines three key elements:
- Volume (to time momentum shifts)
- Liquidity & market structure (to understand where price is headed & why)
- Simple tools (EMAs, Fibonacci, Initial Balance)
The idea is not to blindly follow a signal - it’s to understand why price is moving and align with it.
2. Philosophy
- Keep it simple - remove the noise and trade what’s obvious.
- Volume and structure explain most moves; no need for buzzwords like breaker blocks or fair value gaps (or imbalances which ARE good to use).
- Trade with context: know where price is coming from and where it’s likely to go (HTF POIs).
3. Timeframes & Tools
My Timeframes
- Execution: M1
- Bias (HTF): M15
- Context: H1, H4, Daily (bigger picture trends)
You can also choose to use your own timeframes, these are just what I use.
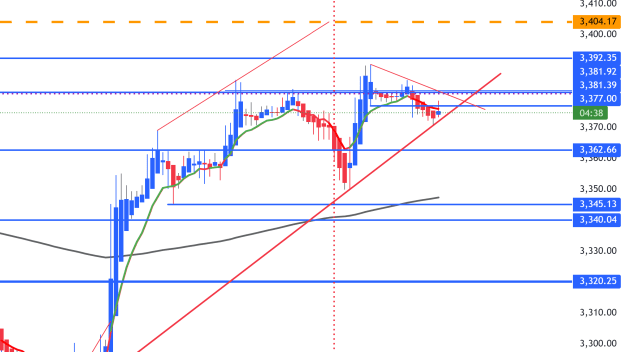
My Indicators
- EMAs: 50, 100, 200 EMA (sometimes 240 LWMA instead of 200 EMA)
- Nova Volume Indicator: Momentum confirmation (bullish/bearish histogram + signal line)
- Fibonacci levels: 50%, 61.8%, 66.5% (sweet spot), 70.5%, 78.6%
Other
- Horizontal levels for liquidity (highs/lows of previous week, day, session, daily open)
4. Pre-Session Prep
Mark Levels (POIS)
- High/low of previous week
- High/low of previous day
- High/low of previous session (Asia if London; London PM if NY)
- Daily open price
- Any obvious imbalances (don’t focus heavily on these, just note them)
These areas are where liquidity pools - price often purges these before reversing or continues after breaking and retesting them.
Define Bias
- Bullish bias: Expect price to sweep lows for liquidity before pushing up.
- Bearish bias: Expect price to sweep highs for liquidity before dropping.
These become your Points of Interest (POIs) for setups.
5. Market Structure (Context)
Structure shows who’s in control:
- Bullish trend: Higher highs + higher lows
- Bearish trend: Lower highs + lower lows
Only trade with the prevailing structure - don’t try to fade a strong trend unless reacting at a higher timeframe POI.
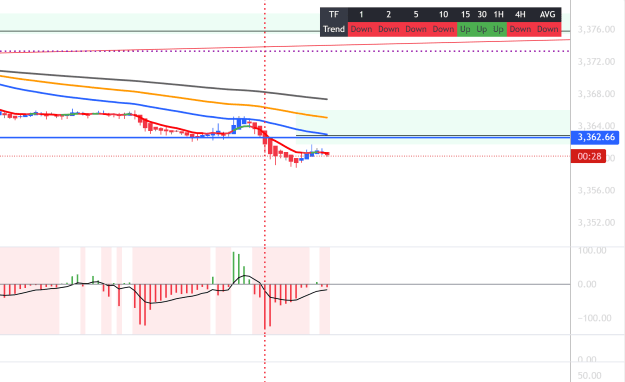
6. Vertical Line Technique (HTF Nova Crosses)
On the M15 (bias timeframe), mark vertical lines where the Nova signal line crosses the zero level:
- In a bullish trend, a cross below 0 often signals a pullback.
- In a bearish trend, a cross above 0 often signals a pullback.
These marks help align your M1 entries - you’ll usually see the EMAs flipping right around these points, which is where high-quality setups form.
7. Entry Models
Momentum (Trend Continuation) Entry
- Confirm HTF bias (M15 structure + Nova signal cross).
- Wait for price to pull back to POI or sweep liquidity.
- Look for bullish/bearish histogram cross above/below 0 on M1 (momentum shift).
- Confirm EMAs are stacked and angled in trade direction.
- Enter on candle close after 2 confirming histogram bars (often open of 3rd).
- Stop: recent swing low/high or IB edge.
- Target: 2:1 minimum - more if context allows.
Reversal (HTF Zone Reaction) Entry
- Identify HTF POI (See above for POI's).
- Wait for Nova momentum shift opposite the prior trend.
- Confirm with EMA flip on M1.
- Enter after 2 confirming histogram bars in reversal direction.
- Stop: beyond recent swing/POI.
- Target: opposing liquidity or next major HTF level (5R+ possible).
9. Risk Management
I personally risk 1–2% per trade. If you’re starting out, I’d suggest 0.5% or lower until you’re consistent - your focus should be survival and learning, not swinging for home runs.
Why I Take Partials
When aiming for bigger targets (like a HTF POI), I’ll take partials at 2:1 and let the rest run. This:
- Banks profit early and reduces emotional stress.
- Keeps you in the game if price reverses before reaching the big target.
- Allows flexibility - you can re-enter on fresh signals without fear of "losing" what you made.
Rules I Stick To
- 1–3 high-quality setups per session.
- If scaling in, set last entry to break-even before adding new positions.
- Move to BE around 1:1 or 1.5:1 (depends on structure and volatility).
- Avoid trading black/white background zones (no momentum) or right into big news events.
10. Advanced Targeting
- If reacting from a higher timeframe POI, target opposite liquidity pools (previous high/low).
- These are where you get 5R–10R+ trades - but don’t force it. Bank profits if market slows or structure shifts.
11. Final Notes
This is the updated system as I use it today. Everything you need to apply Nova is in this post and the first page of the thread.
Keep it simple, trade with context, and don’t overcomplicate what’s already working.