Sometime ago I pointed out that EG strong Pin Bar was formed at the wrong place as the AUDJPYPin Bar formed( I have shared the charts ).
Now I like the EG bearish movement, but love the correlated pair, GCHFbulls
Make all mistakes in demo and rain in pips in live account
Sometime ago I pointed out that EG strong Pin Bar was formed at the wrong place as the AUDJPY Pin Bar formed( I have shared the charts ). Now I like the EG bearish movement, but love the correlated pair, GCHF bulls
Ignored
I decided to join the GCHF bulls early on 4hr
Make all mistakes in demo and rain in pips in live account
Relief now in the sense that it has been able to close above both the SMA and middle. The "Twin"/Duo could send the pair back to where it was coming from
Make all mistakes in demo and rain in pips in live account
Are bears going to push down the AUDNZD. Shooting Star is being formed below both the SMA and middle band. I have been out of the pair. Hope to join the bears and see whether there would be the last low breakout
Ignored
Currently breaking the recent low price. Glad to catch it
Make all mistakes in demo and rain in pips in live account
I missed the EURUSD bearish setup when it was formed. The correlated pair USDCHF long has offered opportunity and have to join the bulls, weekly middle band and daily upper band.
Make all mistakes in demo and rain in pips in live account
GBPJPY long on the move- weekly middle band and daily upper band. The great thing is the Hammer below the upper band. This is the kind of Hammer that has not disappointed me- Hammer below the upper band
Make all mistakes in demo and rain in pips in live account
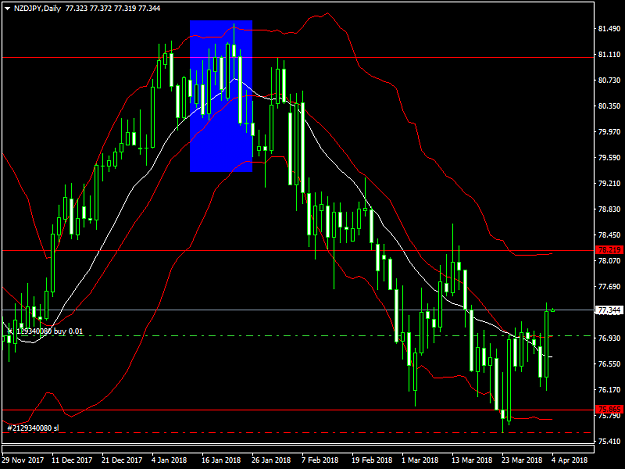
Also used the daily middle band and 4hr to join the AUDJPY bulls and see how it goes. NZDJPY is going well as planned and executed.
Ignored
hello 9ja, been following this thread not long ago and have read couple page from the front and from last page.
the strategies still the same, right?
1. using weekly middle band and daily upper/below band
2. using daily middle band and 4Hr upper band.
set up for AUDJPY was kind of late entry for now. i think entry should be 2 daily candle before. or i missed another set up that can be used for late entry?
{quote} hello 9ja, been following this thread not long ago and have read couple page from the front and from last page. the strategies still the same, right? 1. using weekly middle band and daily upper/below band 2. using daily middle band and 4Hr upper band. set up for AUDJPY was kind of late entry for now. i think entry should be 2 daily candle before. or i missed another set up that can be used for late entry?
Ignored
You're very correct. I got in now because I had internet problem two days ago. It's just a personal risk now as I have to use wider sl, and then move it as soon as possible
Make all mistakes in demo and rain in pips in live account
Hi 9j, I reviewed the thread and couldn't find where you started to use a SMA....it just appeared in you recent posts. It appears to be a 15SMA, is that correct?
Are you just testing this addition? Why this value and not, say, the 5SMA which is used in the "Profit" methodologies?
Hi 9j, I reviewed the thread and couldn't find where you started to use a SMA....it just appeared in you recent posts. It appears to be a 15SMA, is that correct? Are you just testing this addition? Why this value and not, say, the 5SMA which is used in the "Profit" methodologies?
Regrettable good entry point i missed even after closing my short position- the red right red mark. Before the bearish engulfing the bullish made strong attempt but could not close above the middle band except the SMA. {image}
Ignored
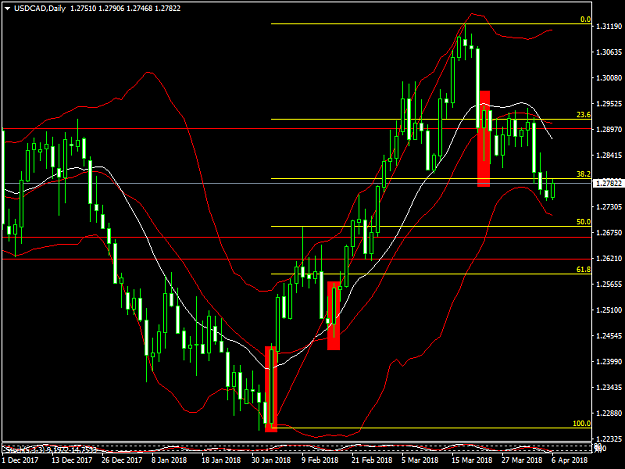
I have entry point here that I missed going through past price chart
{quote} Here is the AUDCAD. You would see that there was weak Pin Bar which closed above SMA, but was having difficulty closing above the the middle band I decided to be sharing the charts bit by bit, instead of waiting to share may at a time {image}
{quote} Here is the AUDCAD. You would see that there was weak Pin Bar which closed above SMA, but was having difficulty closing above the the middle band I decided to be sharing the charts bit by bit, instead of waiting to share many at a time {image}
The backtest of SMA reveals so much to me each time I have the time to study the charts.
One of the great thing is that it can act as both support during bearish retracement and as resistance during bullish retracement.
Wish to share some old charts were it would have offered opportunity to join the trend
Make all mistakes in demo and rain in pips in live account
The backtest of SMA reveals so much to me each time I have the time to study the charts. One of the great thing is that it can act as both support during bearish retracement and as resistance during bullish retracement. Wish to share some old charts were it would have offered opportunity to join the trend
Ignored
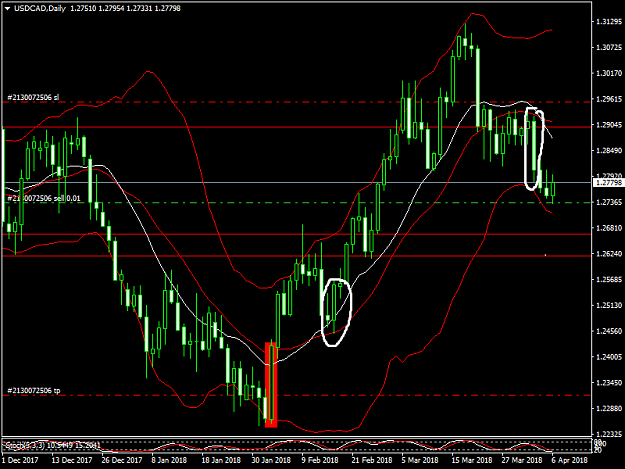
I have one chart on USDCAD during retracement. It would have offered the bulls to join- those who missed the entry point at the beginning. The first "white Mark"
Attached Image (click to enlarge)
Make all mistakes in demo and rain in pips in live account