Disliked.......I'm really interested in learning about EB4's and EB7's in combination with volume spread analysis. I've been searching for some good info on learning about them but haven't found much, at least not the way HiddenGap talks about them....Ignored
What this post is about, will not net you those 200+ pips that malcolmb garnered on Monday. (I officially have my first man-crush ).
This post is about an alternative way to put some pips in your pocket when the market proves you are in tune with it.
Let's first consider a couple of things about expansion bodies:
1. EB7s represent changes in volatility. Specifically spikes or increases in volatility.
There is an ebb and flow to volatility. High periods follow low periods and vice versa.
2. EB7s represent key changes in the underlying supply/demand dynamic in the market. This is one reason thy make good places to look for trade set-ups. Markets move on supply and demand. Targeting entries in those areas, or zones, where there is a change in that supply/demand relationship only makes sense.
If you believe 1&2, then something else naturally comes in to play.
Once in a trade, we could use the appearance of an expansion body as a place to scale out of some of our position. After all, if an expansion body appears, #2 tells us that there may be a change in the supply/demand dynamic. #1 tells us that increased volatility has occurred and we might soon see a decrease in volatility. Two reason we might want to lock in some profits.
Take a look at the chart below.
Again, this post is not about entering the market. It is about ONE way to manage a trade for those who like to scale out.
But first, we do have to say something about entering this trade.
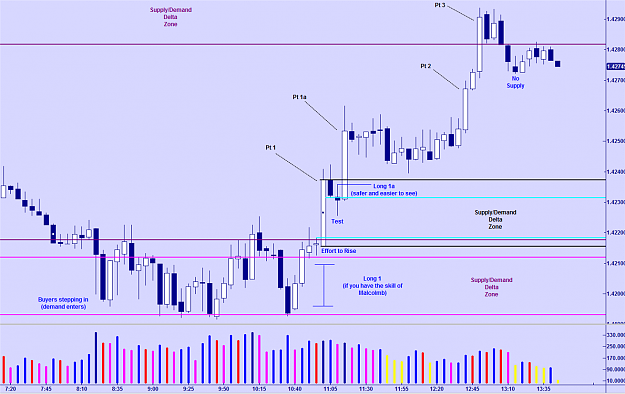
Notice how price moves down into a Supply/Demand Delta created by a significant EB7. We see buyers stepping in and price moves sideways. I am sure malcolmb would see an entry somewhere in this area. I have noted the area as long1. If you see an entry, more power to you (please post it).
The clearer entry point to me is on the test that happens as price pushes thru supply on an effort to rise candle. This entry is labeled long 1a. Gavin would call this the "safer" entry as the trend is up when the test appears. Or at least the evidence is to that fact.
On to the scale outs.
With the appearance of an EB7, one can exit a partial piece of the position.
Pt 1: first partial exit, if you entered below.
Pt 1a: If you entered on the breach of the high of the test candle, then this is your first partial exit. Note that the same candle that brings you into the market also takes a partial out.
Also note in this case, what followed: Volatility decreased. In point of fact, volatility decreased after the effort to rise which set up the long entry 1a. But here it is does so even more. This decrease in volatility does not mean change in trend. It just means price for the moment is not going anywhere fast.
Pt 2: Following the natural ebb and flow, volatility picks up again after the contracting period. The close of this candle is another place to partial out.
Pt 3: This EB7 is interesting. Not only is this an EB7 which would trigger a third scale out, it closes within the Supply/Demand Delta Zone of another EB7.
Another way to scale out or exit completely is to target the nearest overhead (in this case) Supply/Demand Delta Zone. So those who entered at either Long 1 or Long 1a could be targeting this area as an exit point anyway.
There is more than one way to skin a cat. For those who do like to scale out, expansion bodies offer a unique and market driven way to do it. In fact, you don't actually have to believe 1&2 to use them this way. 1&2, however, are about the "why".
***edit****
To be clear, if you enter at Long 1 then there are 4 pts available. So Pt 1a is actually Pt 2, and Pt 2 is Pt 3, and Pt 3 is Pt 4.
Attached Image (click to enlarge)
Without VSA, you're playing checkers while the Smart Money plays chess.
1