{quote} How about you add it to one of your demos? How about you show us how your PSar entries and exits produce far better returns?
Ignored
Sure
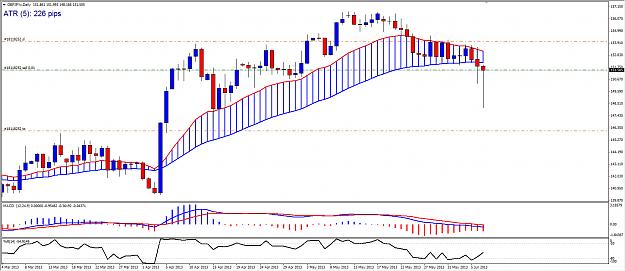
Here is a quick analysis of GBPJPY. I have only been demoing your EA since May 31 but as you can see, it just opened some short trades as it was previously trading between the EMA's and just recently fell below the EMA's. It is currently trading about breakeven. My suggestion of looking at the daily PSar, I would currently be in about 380 pips profit on my short entry dictated by the PSar change on May 22.
Going back to February 13 as an example, you can see my recommended entries on the changing of the PSar indi. I would close an open trade and enter a new trade recommended by the changing PSar at the beginning of each day. I only had one loss of -64 pips but a net total of 2,588 pips.
I like the idea of the additional entries but I would make the first trade larger and scale in with smaller lots. For example, if the first trade was say 1 Lot, 4 more trades could scale in at say 0.2 lots using the same Williams % concept for the scale in entries. All trades close on the change of the PSar indi.
I am not suggesting making any changes to your EA. But like all EA's, this shouldn't be a set and forget EA and a view of the PSar action would certainly help in making any manual decisions of getting out early or whatever.
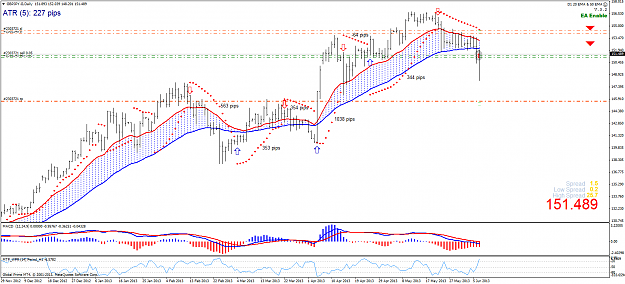
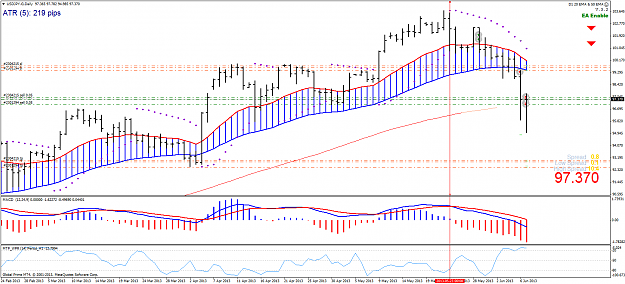
Here is another example where the PSar would have saved me a big loss. The USDJPY took several Long entries as it did meet the EA criteria however the PSar was definitely in a Short mode. I actually had SL's hit on these Long trades however if I had taken a short trade when the PSar changed to short (see the red vertical line), I would be banking about 580 pips right now.
Using the PSar, you could decide to turn off the EA during these possible reversals. Again, just food for thought.
|
Joined Sep 2011
|
Status: Would like to profit consistently
|233 Posts
[Edit: hmm... logic for EMA criteria on D1 appears to be flawed... Back to debugging..]
A couple of years ago I've bought a lifetime license for Ninjatrader ($995).
Still trying to get a return on my investment
Therefore I've made an EA for NT for 100PipsADay's strategy. Now I can sit back relax and see the money pouring into my account
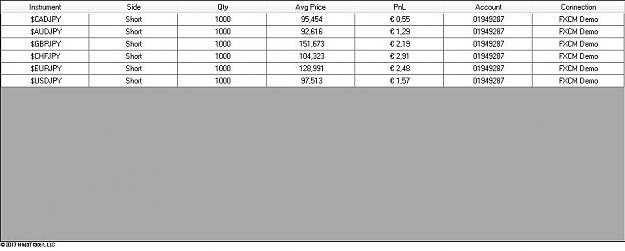
I'm currently testing it and it has just opened a number of JPY trades (see screenshot).
Here's the code in case other NT users want to give this a try:
Inserted Code
#region Using declarations
using System;
using System.ComponentModel;
using System.Diagnostics;
using System.Drawing;
using System.Drawing.Drawing2D;
using System.Xml.Serialization;
using NinjaTrader.Cbi;
using NinjaTrader.Data;
using NinjaTrader.Indicator;
using NinjaTrader.Gui.Chart;
using NinjaTrader.Strategy;
#endregion

// This namespace holds all strategies and is required. Do not change it.
namespace NinjaTrader.Strategy
{
    /// <summary>
    /// D1 - 20 EMA & 50 EMA Trend Strategy Rules & Parameters  1) Price needs to be above or below BOTH the 20 EMA and 50 EMA on the Daily chart. Above = BUY Below = SELL  2) New positions are opened up using H1 Williams % Indicator when price is Over Bought or Over Sold. We do not need to wait for H1 to close in OB or OS area. Once price moves into OB or OS area then 1 position opens up.  3) IF price moves in between the 20 EMA and the 50 EMA then NO positions should be opened until price breaks out above or below BOTH the 20 & 50 EMAs. If price is stuck in between the two EMA's then this tells us that market is probably ranging so it is best not to add any more positions.  4) NO opposing positions should be opened no matter what (no hedging same currency pair with buy and sell positions)  5) Time Delay in between new positions should be at least 6-12 hours apart. Different time delays between opening new positions are currently being tested on multiple currency pairs.  6) SL 250 & TP 350 (Recommended SL & TP Parameters)   7) Max Positions 8
    /// </summary>
    [Description("D1 - 20 EMA & 50 EMA Trend Strategy Rules & Parameters  1) Price needs to be above or below BOTH the 20 EMA and 50 EMA on the Daily chart. Above = BUY Below = SELL  2) New positions are opened up using H1 Williams % Indicator when price is Over Bought or Over Sold. We do not need to wait for H1 to close in OB or OS area. Once price moves into OB or OS area then 1 position opens up.  3) IF price moves in between the 20 EMA and the 50 EMA then NO positions should be opened until price breaks out above or below BOTH the 20 & 50 EMAs. If price is stuck in between the two EMA's then this tells us that market is probably ranging so it is best not to add any more positions.  4) NO opposing positions should be opened no matter what (no hedging same currency pair with buy and sell positions)  5) Time Delay in between new positions should be at least 6-12 hours apart. Different time delays between opening new positions are currently being tested on multiple currency pairs.  6) SL 250 & TP 350 (Recommended SL & TP Parameters)   7) Max Positions 8 ")]
    public class D1EMA20EMA50 : Strategy
    {
        #region Variables
        // Wizard generated variables
        private int stopsize = 3; // Default setting for Stopsize
        private int targetsize = 5; // Default setting for Targetsize
        private int aTRPeriod = 60; // Default setting for ATRPeriod
        private int timeBetweenTrades = 6; // Default setting for TimeBetweenTrades
        private int williamsOverbought = -20; // Default setting for WilliamsOverbought
        private int williamsOversold = -80; // Default setting for WilliamsOversold
        private int slowEMA = 50; // Default setting for SlowEMA
        private int fastEMA = 20; // Default setting for FastEMA
        // User defined variables (add any user defined variables below)
        #endregion

        /// <summary>
        /// This method is used to configure the strategy and is called once before any strategy method is called.
        /// </summary>
        protected override void Initialize()
        {
 // AUDCAD (0 and 1)
 // Primary chart should be set to AUDCAD 60 minutes. This instrument will have index 0 assigned.
 // The following line adds the daily for AUDCAD having index 1.
 Add(PeriodType.Day, 1);

 // AUDJPY (2 and 3)
 Add("$AUDJPY", PeriodType.Minute, 60);
 Add("$AUDJPY", PeriodType.Day, 1);

 // AUDNZD (4 and 5)
 Add("$AUDNZD", PeriodType.Minute, 60);
 Add("$AUDNZD", PeriodType.Day, 1);

 // AUDUSD (6 and 7)
 Add("$AUDUSD", PeriodType.Minute, 60);
 Add("$AUDUSD", PeriodType.Day, 1);

 // CADJPY (8 and 9)
 Add("$CADJPY", PeriodType.Minute, 60);
 Add("$CADJPY", PeriodType.Day, 1);

 // CHFJPY (10 and 11)
 Add("$CHFJPY", PeriodType.Minute, 60);
 Add("$CHFJPY", PeriodType.Day, 1);

 // EURAUD (12 and 13)
 Add("$EURAUD", PeriodType.Minute, 60);
 Add("$EURAUD", PeriodType.Day, 1);

 // EURCAD (14 and 15)
 Add("$EURCAD", PeriodType.Minute, 60);
 Add("$EURCAD", PeriodType.Day, 1);

 // EURGBP (16 and 17)
 Add("$EURGBP", PeriodType.Minute, 60);
 Add("$EURGBP", PeriodType.Day, 1);

 // EURJPY (18 and 19)
 Add("$EURJPY", PeriodType.Minute, 60);
 Add("$EURJPY", PeriodType.Day, 1);

 // EURNZD (20 and 21)
 Add("$EURNZD", PeriodType.Minute, 60);
 Add("$EURNZD", PeriodType.Day, 1);

 // EURUSD (22 and 23)
 Add("$EURUSD", PeriodType.Minute, 60);
 Add("$EURUSD", PeriodType.Day, 1);

 // GBPAUD (24 and 25)
 Add("$GBPAUD", PeriodType.Minute, 60);
 Add("$GBPAUD", PeriodType.Day, 1);

 // GBPJPY (26 and 27)
 Add("$GBPJPY", PeriodType.Minute, 60);
 Add("$GBPJPY", PeriodType.Day, 1);

 // GBPNZD (28 and 29)
 Add("$GBPNZD", PeriodType.Minute, 60);
 Add("$GBPNZD", PeriodType.Day, 1);

 // GBPUSD (30 and 31)
 Add("$GBPUSD", PeriodType.Minute, 60);
 Add("$GBPUSD", PeriodType.Day, 1);

 // NZDJPY (32 and 33)
 Add("$NZDJPY", PeriodType.Minute, 60);
 Add("$NZDJPY", PeriodType.Day, 1);

 // NZDUSD (34 and 35)
 Add("$NZDUSD", PeriodType.Minute, 60);
 Add("$NZDUSD", PeriodType.Day, 1);

 // USDCAD (36 and 37)
 Add("$USDCAD", PeriodType.Minute, 60);
 Add("$USDCAD", PeriodType.Day, 1);

 // USDJPY (38 and 39)
 Add("$USDJPY", PeriodType.Minute, 60);
 Add("$USDJPY", PeriodType.Day, 1);

 BarsRequired = 0;
 EntriesPerDirection = 8;
 EntryHandling = EntryHandling.UniqueEntries;
 ExitOnClose = false;
 DefaultQuantity = 1000;
            CalculateOnBarClose = false;
 TraceOrders = true;
        }

 private void PlaceOrder(int hourly, int daily, string currency, int stop, int target)
 {
     // Condition set 1 - Short
            if (Positions[hourly].MarketPosition != MarketPosition.Long
 && WilliamsR(BarsArray[hourly], 14)[0] > williamsOverbought
 && Closes[daily][0] < EMA(BarsArray[daily], fastEMA)[0]
 && Closes[daily][0] < EMA(BarsArray[daily], slowEMA)[0])
            {
 if (BarsSinceEntry(hourly, currency + " Short", 0) >= timeBetweenTrades || Positions[hourly].MarketPosition == MarketPosition.Flat)
 {
 EnterShort(DefaultQuantity, currency + " Short");
 SetProfitTarget(currency + " Short", CalculationMode.Ticks, target);
 SetStopLoss(currency + " Short", CalculationMode.Ticks, stop, false);
 }
            }

            // Condition set 2 - Long
            if (Positions[hourly].MarketPosition != MarketPosition.Short
 && WilliamsR(BarsArray[hourly], 14)[0] < williamsOversold
 && Closes[daily][0] > EMA(BarsArray[daily], fastEMA)[0]
 && Closes[daily][0] > EMA(BarsArray[daily], slowEMA)[0])
            {
 if (BarsSinceEntry(hourly, currency + " Long", 0) >= timeBetweenTrades || Positions[hourly].MarketPosition == MarketPosition.Flat)
 {
 EnterLong(DefaultQuantity, currency + " Long");
 SetProfitTarget(currency + " Long", CalculationMode.Ticks, target);
 SetStopLoss(currency + " Long", CalculationMode.Ticks, stop, false);
 }
            }

 }
        /// <summary>
        /// Called on each bar update event (incoming tick)
        /// </summary>
        protected override void OnBarUpdate()
        {
 if (Historical)
 return;

 // Each instrument will be watched on every tick.
 // The following method first evaluates entry conditions and then places orders:
 //
 // PlaceOrder(int hourly, int daily, string currency, int stop, int target)
 //
 // The stops and targets have been posted by 100PipsADay at:
 //
 // http://www.forexfactory.com/showthread.php?p=6675401#post6675401

 // AUDCAD (0 and 1)
 if (BarsInProgress == 0)
 PlaceOrder(0, 1, "AUDCAD", 160, 320);

 // AUDJPY (2 and 3)
 if (BarsInProgress == 2)
 PlaceOrder(2, 3, "AUDJPY", 225, 450);

 // AUDNZD (4 and 5)
 if (BarsInProgress == 4)
 PlaceOrder(4, 5, "AUDNZD", 175, 350);

 // AUDUSD (6 and 7)
 if (BarsInProgress == 6)
 PlaceOrder(6, 7, "AUDUSD", 200, 400);

 // CADJPY (8 and 9)
 if (BarsInProgress == 8)
 PlaceOrder(8, 9, "CADJPY", 225, 450);

 // CHFJPY (10 and 11)
 if (BarsInProgress == 10)
 PlaceOrder(10, 11, "CHFJPY", 250, 500);

 // EURAUD (12 and 13)
 if (BarsInProgress == 12)
 PlaceOrder(12, 13, "EURAUD", 200, 400);

 // EURCAD (14 and 15)
 if (BarsInProgress == 14)
 PlaceOrder(14, 15, "EURCAD", 200, 400);

 // EURGBP (16 and 17)
 if (BarsInProgress == 16)
 PlaceOrder(16, 17, "EURGBP", 160, 320);

 // EURJPY (18 and 19)
 if (BarsInProgress == 18)
 PlaceOrder(18, 19, "EURJPY", 250, 500);

 // EURNZD (20 and 21)
 if (BarsInProgress == 20)
 PlaceOrder(20, 21, "EURNZD", 250, 500);

 // EURUSD (22 and 23)
 if (BarsInProgress == 22)
 PlaceOrder(22, 23, "EURUSD", 225, 450);

 // GBPAUD (24 and 25)
 if (BarsInProgress == 24)
 PlaceOrder(24, 25, "GBPAUD", 225, 450);

 // GBPJPY (26 and 27)
 if (BarsInProgress == 26)
 PlaceOrder(26, 27, "GBPJPY", 300, 600);

 // GBPNZD (28 and 29)
 if (BarsInProgress == 28)
 PlaceOrder(28, 29, "GBPNZD", 300, 600);

 // GBPUSD (30 and 31)
 if (BarsInProgress == 30)
 PlaceOrder(30, 31, "GBPUSD", 250, 650);

 // NZDJPY (32 and 33)
 if (BarsInProgress == 32)
 PlaceOrder(32, 33, "NZDJPY", 225, 450);

 // NZDUSD (34 and 35)
 if (BarsInProgress == 34)
 PlaceOrder(34, 35, "NZDUSD", 200, 400);

 // USDCAD (36 and 37)
 if (BarsInProgress == 36)
 PlaceOrder(36, 37, "USDCAD", 160, 320);

 // USDJPY (38 and 39)
 if (BarsInProgress == 38)
 PlaceOrder(38, 39, "USDJPY", 225, 450);

        }

        #region Properties
        [Description("Stop is Stopsize times ATR")]
        [GridCategory("Parameters")]
        public int Stopsize
        {
            get { return stopsize; }
            set { stopsize = Math.Max(1, value); }
        }

        [Description("Target is Targetsize times ATR")]
        [GridCategory("Parameters")]
        public int Targetsize
        {
            get { return targetsize; }
            set { targetsize = Math.Max(1, value); }
        }

        [Description("Define the ATR period.")]
        [GridCategory("Parameters")]
        public int ATRPeriod
        {
            get { return aTRPeriod; }
            set { aTRPeriod = Math.Max(1, value); }
        }

        [Description("Number of hours in between trades")]
        [GridCategory("Parameters")]
        public int TimeBetweenTrades
        {
            get { return timeBetweenTrades; }
            set { timeBetweenTrades = Math.Max(1, value); }
        }

        [Description("Define overbought area")]
        [GridCategory("Parameters")]
        public int WilliamsOverbought
        {
            get { return williamsOverbought; }
            set { williamsOverbought = value; }
        }

        [Description("Define oversold area")]
        [GridCategory("Parameters")]
        public int WilliamsOversold
        {
            get { return williamsOversold; }
            set { williamsOversold = value; }
        }

        [Description("Define Slow EMA period")]
        [GridCategory("Parameters")]
        public int SlowEMA
        {
            get { return slowEMA; }
            set { slowEMA = Math.Max(1, value); }
        }

        [Description("Define Fast EMA period")]
        [GridCategory("Parameters")]
        public int FastEMA
        {
            get { return fastEMA; }
            set { fastEMA = Math.Max(1, value); }
        }
        #endregion
    }
}
D1 goes to mt4/experts,
100pipsaday.tpl goes into mt4/templates
atr goes into mt4/indicators
????
Also I cant find the time lapse b/w trades posted here, reference your post:
[Time Delay in between new positions should be at least 6-12 hours apart]
You had XAUUSD, dow jones (WS30) and crude light oil (WTI), but these had no recommended SL, TP. Pls advise?
My friend told me that some also add PSAR, how does this affect the EA? Or PSAR is added for manual intervention if necessary?
{quote} Sure Here is a quick analysis of GBPJPY. I have only been demoing your EA since May 31 but as you can see, it just opened some short trades as it was previously trading between the EMA's and just recently fell below the EMA's. It is currently trading about breakeven. My suggestion of looking at the daily PSar, I would currently be in about 380 pips profit on my short entry dictated by the PSar change on May 22. Going back to February 13 as an example, you can see my recommended entries on the changing of the PSar indi. I would close an open...
Ignored
This is a trend trading system and adds to positions for larger moves. In the chart you showed, look to the left to see how many times the PSAR changed from long to short to long to short while the 20/50 ema method kept you in one direction (long) for the big move higher. The PSAR is too choppy to scale-in unless the settings are changed or you go for smaller targets. I haven't reviewed much but just looking at the chart you posted. Best to demo your method then post the results.