TEB 4 MA system
This was one of the 1st system I worked on
It is vert simple but works well
It is based on the ebook- start on page 5 save some time
I did add a few changes
5 EMA blue thin
12 EMA red thin
20SMA blue Thick
50 EMA RED THICK
PRICE line Yellow ( 1 SMA). " the target"
I used it before I understood candle.. with it you don't have to understand candles
in fact I think the system works better with out candles
it is earier to see the crosses& bounces
"I just replaced the candles with the normal price line (1SMA)
its on your chart right beside the candle sign on the tool bar
it is a basic MA crosses
Also as an added strenght-
only take trades up when both blues are up over their red partners
only take trades down when both reds are up over their blue Partners
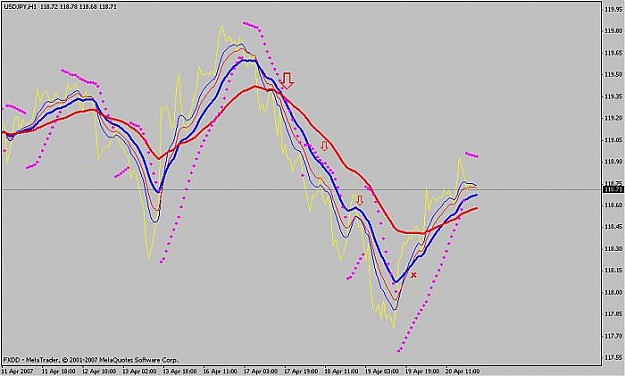
Enter (see chart 1)
1st kind - Initial (aggressive) entry 1st big red arrow
50 EMA trend setter only trade with him at your back
20SMA is the wall to decide the trade.. got to get over it.
the wall must have the trend setter at its back
5 EMA is the bird dog to - warn of an up coming trade..
12 EMA is the trigger man
When the 12EMA trigger man & the bird dog 5EMA go over the wall 20SMA
& with the trendsetter 50EMA at their back ....you are in
2nd kind- Pullback (conservative) entry the 2 small red arrows
Sames as the ( Initial (aggressive) entry )
But this time the 12 EMA trigger man waits in ambush
for price to come back into his line of fire
price touches or passes through the trigger man 12 EMA space & comes back through again
The trigger man always wants to be between price & the wall 20SMA
with the wall 20SMA between him & trendsetter 50EMA
when he takes the trade
Exits The red "X" ( see chart 1)
you are out when the 12EMA trigger man & 5SMA bird dog come back over the wall 20SMA
or 50 EMA trendsetter comes over the wall 20SMA after the 12EMA trigger man & 5 EMA bird dog
Bird dog rules
If the bird dog 5EMA sniffs price out
and trigger man 12EMA is not to far away from the wall 20SMA
and the price "the Target" cuts back towards the wall the 20SMA from a distances
and them tries to out run the dog 5EMA in the opp. direction from wall 20SMA
with the trend finder 50EMA where he should be
then trigger man 12 EMA should do your duty
two tricks I have found that may help
on any MA cross System esp. any "MA bounce or breaks" systems
that give you a better enter & keep you out of bad trades
ie getting chopped to death are
1. if you are trading on the 1 hour chart (chart 2nd 15 min chart)
.. when you get the set up you want
drop down to the 15 min chart
put a sars on it & let the sars be the enter sign
you will get a better price
& miss about 30% of the bad trades.
I like this one
if trading on the 4 hour drop down to the hour etc
2. if you want to keep it all on one chart (3rd chart hour chart)
put on a slow stoch at 14,3,3 low/high
and only trade with it
& again it will miss about 25% of the bad trades.
Don't do both it will only confuse the issue,
I have tried... do one or the other
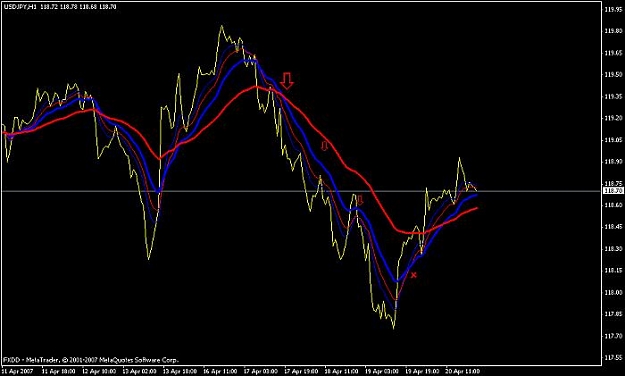
hour chart
Big arrow is 1st cross & enter
little arrows are bounces & so enter
"X" is out
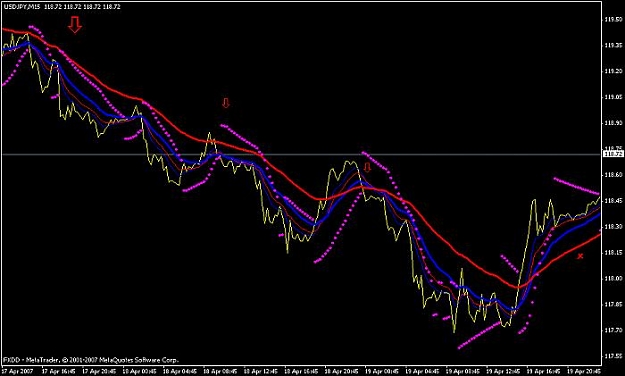
'15 min Chart -confirm with sacs
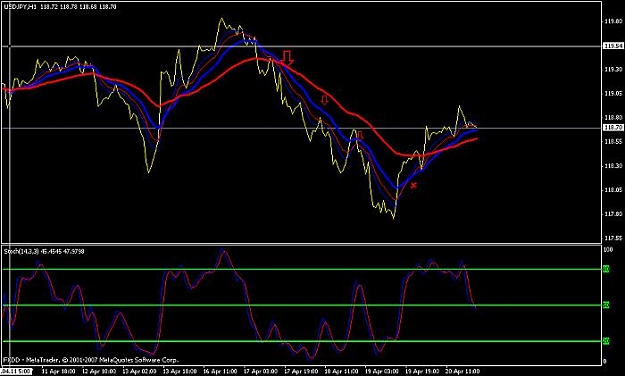
hour chart-- confirn with Stoch 14,3,3
Need good money Management
But it will win a lot more then it loses
Hope you make some money
& have some fun with this
TEB
This was one of the 1st system I worked on
It is vert simple but works well
It is based on the ebook- start on page 5 save some time
Attached File(s)
I did add a few changes
5 EMA blue thin
12 EMA red thin
20SMA blue Thick
50 EMA RED THICK
PRICE line Yellow ( 1 SMA). " the target"
I used it before I understood candle.. with it you don't have to understand candles
in fact I think the system works better with out candles
it is earier to see the crosses& bounces
"I just replaced the candles with the normal price line (1SMA)
its on your chart right beside the candle sign on the tool bar
it is a basic MA crosses
Also as an added strenght-
only take trades up when both blues are up over their red partners
only take trades down when both reds are up over their blue Partners
Enter (see chart 1)
1st kind - Initial (aggressive) entry 1st big red arrow
50 EMA trend setter only trade with him at your back
20SMA is the wall to decide the trade.. got to get over it.
the wall must have the trend setter at its back
5 EMA is the bird dog to - warn of an up coming trade..
12 EMA is the trigger man
When the 12EMA trigger man & the bird dog 5EMA go over the wall 20SMA
& with the trendsetter 50EMA at their back ....you are in
2nd kind- Pullback (conservative) entry the 2 small red arrows
Sames as the ( Initial (aggressive) entry )
But this time the 12 EMA trigger man waits in ambush
for price to come back into his line of fire
price touches or passes through the trigger man 12 EMA space & comes back through again
The trigger man always wants to be between price & the wall 20SMA
with the wall 20SMA between him & trendsetter 50EMA
when he takes the trade
Exits The red "X" ( see chart 1)
you are out when the 12EMA trigger man & 5SMA bird dog come back over the wall 20SMA
or 50 EMA trendsetter comes over the wall 20SMA after the 12EMA trigger man & 5 EMA bird dog
Bird dog rules
If the bird dog 5EMA sniffs price out
and trigger man 12EMA is not to far away from the wall 20SMA
and the price "the Target" cuts back towards the wall the 20SMA from a distances
and them tries to out run the dog 5EMA in the opp. direction from wall 20SMA
with the trend finder 50EMA where he should be
then trigger man 12 EMA should do your duty
two tricks I have found that may help
on any MA cross System esp. any "MA bounce or breaks" systems
that give you a better enter & keep you out of bad trades
ie getting chopped to death are
1. if you are trading on the 1 hour chart (chart 2nd 15 min chart)
.. when you get the set up you want
drop down to the 15 min chart
put a sars on it & let the sars be the enter sign
you will get a better price
& miss about 30% of the bad trades.
I like this one
if trading on the 4 hour drop down to the hour etc
2. if you want to keep it all on one chart (3rd chart hour chart)
put on a slow stoch at 14,3,3 low/high
and only trade with it
& again it will miss about 25% of the bad trades.
Don't do both it will only confuse the issue,
I have tried... do one or the other
Attached Image (click to enlarge)
hour chart
Big arrow is 1st cross & enter
little arrows are bounces & so enter
"X" is out
Attached Image (click to enlarge)
'15 min Chart -confirm with sacs
Attached Image (click to enlarge)
hour chart-- confirn with Stoch 14,3,3
Need good money Management
But it will win a lot more then it loses
Hope you make some money
& have some fun with this
TEB