Unfortunately, I wasn't around when this one kicked-off, but it's worth showing because of how each indicator comes into play.
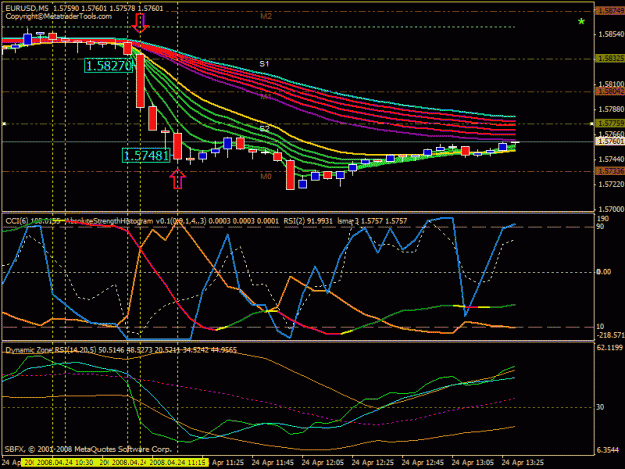
As you can see at the first yellow vertical, nothing much is happening.....price is just trundling along sideways, with the ASH around the OS zone and the lsma3 way up around the OB zone. However, the RSI2 has just crossed the zero line, with the DZ green/blue crossing just before the second yellow vertical, which, in its turn, shows the CCI6 following the RSI2 down below the zero line. Then follows a waiting period of nearly half-an-hour before things start developing. The third yellow vertical shows the DZ RSI2 (green line) pushing below the red dotted line, whilst in the middle window, ASH is starting to rise, creating the beginnings of the orange/blue zone, which CCI6 is starting to enter. It's still not time to enter the trade, however, because of the close proximity of the S1 line. Once price crosses this, THEN we can choose to enter the trade. The fourth yellow vertical gives us everything we want....the widening and separating of the Guppy MMA's, price dropping below the S1 line and lsma3 finally entering the orange/blue zone, and the Label (1.58720) indicates approximately where an entry would be made. From then on, with Guppy MMA'S continuing to widen, it's a breeze, with price dropping nicely, until it gets very near the M0 line which is a good place to jump ship at 1.57481 with a nice profit (fifth yellow vertical).
There's no doubt that the Dollie method requires a lot of screen time, watching and waiting for everything to come together in this particular TF, which is why an hourly method was developed by Dollie and Pip Pirate2, amongst others. If the longer TF interests you, then read the whole thread, as longer TF's just aren't my "thing"!!
Cheers
Attached Image (click to enlarge)