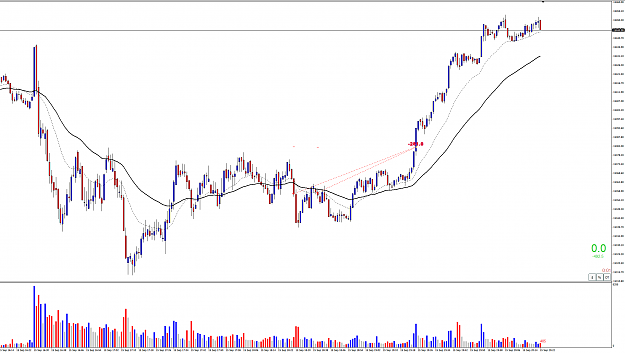
1. Do you look for exact definition of no supply no demand bars - volume lower than previous 2 bars and spread lower than previous bar or just volume below the 2 previous bar is enough for a no demand no supply
Ignored
The TradeGuider software will identify some No Demand/No Supply bars where the range is increasing, even though the base definition states the range is decreasing (or is narrow). When I see a bar with volume less than the previous two but an increasing range, I tend to think/call it No Buying Pressure orNo Selling Pressure. I believe this interpretation is consistent with what Tom says in Master the Markets.
As I just recently stated, the best No Demand/No Supply bars tend to appear on bars where the range is less than the previous 3 or 5 bars. Also known as NR3s or NR5s respectively,
2. On the chart you would enter after the last no demand bar even tough the volume on the entry is below the previous 2 bars (the spread is higher so is not the exact definition of no demand, that is why the first question) Thanks Kind Regards
Ignored
Entry occurs when the No Demand bar is confirmed with the next bar DOWN. It would be nice if the volume was increasing, but a lot of times it will not be. This is just something you have to understand. At this point though, one should take a step back. There is weakness in the background, price is below the 20 period EMA , and the Volume Pressure Gauge is RED. Simply put, at that point I would be predisposed to get short. Accordingly, I expect No Demands to confirm and No Supplies to fail.
Without VSA, you're playing checkers while the Smart Money plays chess.
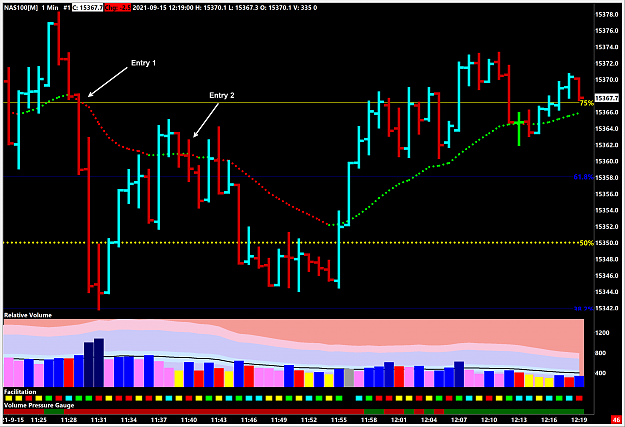
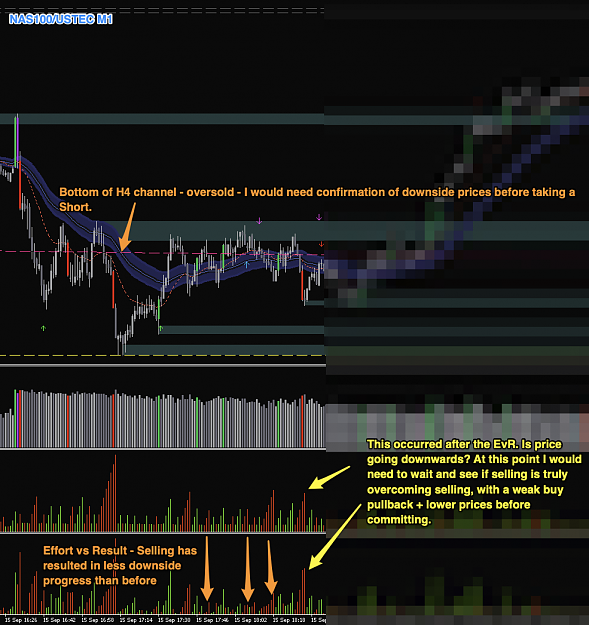
Issue 1: get off the m1 chart. Okay, you don't actually have to get off the m1 chart, if you heed the advice that follows.
Issue 2: I have tried to show the two entries you took to the short side on my chart. I submit to you that neither of those trades should have been taken. Why? Because they lost? No, because both entries are above HB. People may want to claim that is hindsight, but Pres78 said "don't take longs below the midpoint (HB), or shorts above the midpoint (HB) of the HVZ more than 5 years before today. I expressly wrote that a week ago.
Step 1: Follow an H1 chart. When you see the day's highest volume bar develop, place a line at the High, at the low, and at the midpoint (HB). Once you have marked, or FIBbed, the high volume candle, drop down to the M1 for your "sniper" entries.
If you would have FIBbed the HVC, you would have seen that those entries, although congruent with the trend of the MAs, are on the wrong side of the 50% line (HB).
Attached Image (click to enlarge)
Note that I have not mentioned anything about the price intervals themselves, nor have I mentioned anything about the volume associated with the respective intervals. That's because neither of those things supersedes the fact that price is on the wrong side of HB to go short.
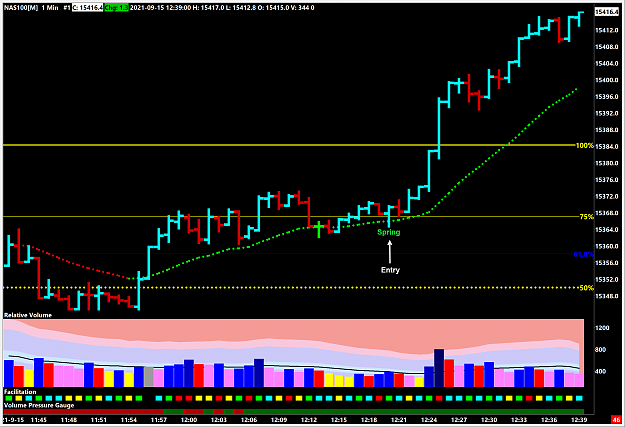
Step 2: Once the fast MA moves above the slow MA and price is above HB, it's time to look for longs. On my chart, there is a nice "spring" entry on the quarter line and on the 20 MA. (support and rolling support respectively).
Attached Image (click to enlarge)
Issue 3: Even if you do take those first two entries, you need to be able to admit you are wrong, get out of the trade (s), and enter a trade in the opposite direction. I am not talking about "revenge" trading, I am talking about analyzing the new information available and being willing to draw a new conclusion. Again, I'm not talking about always stopping out and reversing a position. I'm talking about understanding when you should.
Once price fails to make a lower low, price moves above the MAs, and the MAs swap position, you should at least be thinking "I need to get out of my shorts".
The fact that you took a loss doesn't matter. There will always be losses in Trading. In fact, there may well be more losses than wins. Your errors were letting the loss be as big as it was and not recognizing the opportunity to take a trade in the opposite direction. A properly FIBed HVC would have helped with the latter.
Without VSA, you're playing checkers while the Smart Money plays chess.
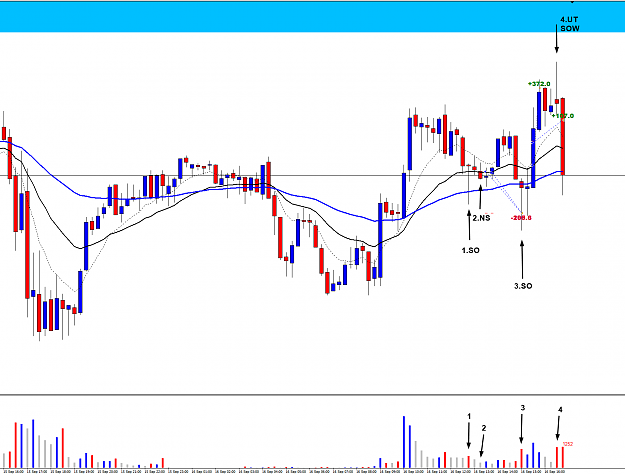
I definitely don't do it enough, but I tried my hand a little bar-by-bar analysis w/ a trade I entered in my IRA. (There's some shorthand Wyckoff Schematic to ignore on the chart)
Ironically, the more I analyze today's entry, the less confident I am in the trade lol. I'm definitely open to feedback, especially for bars I,J,K which throw me for a loop:
Foreground: (Aka handful of recent bars) Price is showing strength as the market tries to force lower prices Background: Potential stopping volume on 7/19. On the other hand, price is making LHs and tests of the $18.25 level are becoming more frequent. Price having trouble moving away from the lows could speak to absorption by sellers as they fade every move higher for an eventual breakdown
A - Increase in volume and close off the lows.
B - Volume dries up as price tests lower levels. Next bar up
C - Gap higher but on lower volume. Proceed w/ caution
D - Narrower range than the last bar but an increase in volume. Proceed w/ caution
E - Increased spread and lower volume. Smart money isn't buying
F - Outside reversal but closing off the lows on reduced volume. Smart money isn't selling either
G - No Demand as price nears trendline
H - Increased volume and closing @ the lows = bearish sentiment
I - Price rejects lows beyond prior bar and pushes higher. Increase in volume but smaller spread. Does this insinuate that selling is present?
J - Is this No Supply because of the attempt to move lower on low volume? Or is it a bearish Hidden Upthrust since it pushed higher before ending on its lows?
K - My guess is that this bar is essentially transparent and inherits the bullishness/bearishness of the background or prior bars
L - Wider spread than prior bar, but same volume. Smart Money is not actively selling
M - No demand
N - Outside reversal closing on the lows. Bearish
1 - 2 Bar Reversal on heavy volume. Sentiment is turning bullish
2 - All the gains are wiped out. Reduced volume which is somewhat positive
3 - Price rejects new lows and closes on the highs. Increasingly bullish
4 - Price sells off on reduced volume. Increasingly bullish
5 - Price rejects lows beyond the prior bar and closes on the highs. Also acts as a potential test of bar #2. Most bullish bar since 2BR.
{quote} Issue 1: get off the m1 chart. Okay, you don't actually have to get off the m1 chart, if you heed the advice that follows. Issue 2: I have tried to show the two entries you took to the short side on my chart. I submit to you that neither of those trades should have been taken. Why? Because they lost? No, because both entries are above HB. People may want to claim that is hindsight, but Pres78 said "don't take longs below the midpoint (HB), or shorts above the midpoint (HB) of the HVZ more than 5 years before today. I expressly...
Ignored
I see the term "spring" mentioned a few times over different posts mate,
I know what it means from a "wyckoff" structure perspective (Phase C of a type 1 Accumulation), but not sure of the VSA meaning.
Tom Williams mentions a "spring-board" which he describes as a low volume test which grabs liquidity, is that what you mean by "spring"?
Also wondering if you can comment on this post mate.
Although I found an excerpt from MTM which confirms Malcolms comment, I found further excerpts which contradicts it
"The high volume means that we must judge the test to have failed. A successful test needs low volume, not high. At this stage, the market is not ready for an up-move, as there is still supply present."
{quote} Although I found an excerpt from MTM which confirms Malcolms comment, I found further excerpts which contradicts it "The high volume means that we must judge the test to have failed. A successful test needs low volume, not high. At this stage, the market is not ready for an up-move, as there is still supply present." Cheers
Ignored
Malcolm has always been a little loose with VSA terminology, he's mentioned it before basically saying he doesn't get caught up with all of the names. From the post and my vague understanding of open ranges, when he says ultra high volume tests I suspect he is really saying shakeout. Shakeouts especially when they are at the end of an accumulation phase are easy money. A true shakeout is violent, larger spread and high volume, 9/10 times price breaks out of the accumulation area and starts the trend after a true shakeout.
Going into what failed tests that Tom Williams was talking about in MTM, as a starting point he looks for stopping volume then price to rally and finally decline back into the stopping volume with down bars decreasing in volume and spread. On that decline, if he sees increased spread/volume then he considers it a failed test and moves onto to another setup. Here is the a blown up screen of the image that is on page 158 in MTM, I think they were really stretching the failed test in this screenshot. Maybe he couldn't find a better example or maybe he was really trying to showcase that VSA can pick bottoms.
Joined Mar 2009
|
Status: Hobby Trader
|4,477 Posts
Attached Image (click to enlarge)
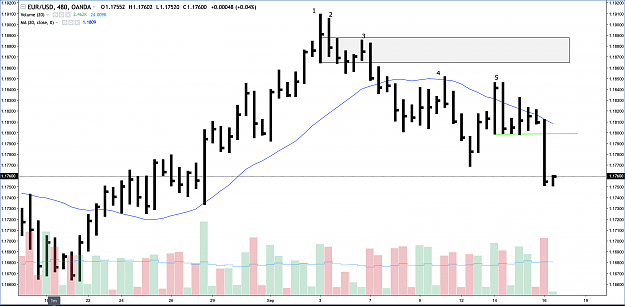
This is a EURUSD 8 hour chart (480 min). I've chosen this longer term time frame for several reasons. Here are just a couple:
1. 4h and lower time frame opportunities seem to mostly happen when I'm unconscious
2. Very low time frame opportunities do occur during NY but require constant attention to the screen which I no longer want to do
Please don't hesitate to correct me where you see errors or make comments.
1. High volume up bar signifying smart sellers active
2. Still high volume bar closing lower confirms sellers
3. No demand on very low volume. Trend is still up so even though this would be a tempting entry.
4. Upthrust on high volume closing below close of previous bar so a hidden upthrust. This bar tests the 20 MA. Since price is below the 20 MA one could consider this satisfactory for downtrend. An entry below this bar seems reasonable of course it's in hindsight.
5. This is a 2 bar SOW formation on high volume. I guess somewhat like a 2 bar upthrust. I need to find the correct definition but I think this qualifies as a possible entry when price breaks below the structure.
{quote} I see the term "spring" mentioned a few times over different posts mate, I know what it means from a "wyckoff" structure perspective (Phase C of a type 1 Accumulation), but not sure of the VSA meaning. Tom Williams mentions a "spring-board" which he describes as a low volume test which grabs liquidity, is that what you mean by "spring"? Also wondering if you can comment on this post mate. https://www.forexfactory.com/thread/...8#post13706498Although I found an excerpt from MTM which confirms Malcolms comment, I found...
Ignored
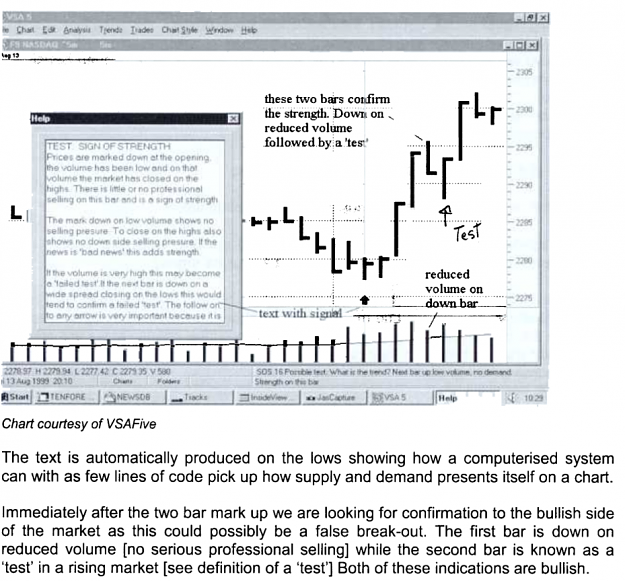
In TW's other book, Undeclared Secrets That Drive the Stock Market, TW has a heavy volume tests that he takes on p15 (see attached pic) and a deeper explanation in general on p27:
High volume or high activity shows there is in fact selling [supply] on the mark down. This process is known as testing. You can have successful tests on low volume and tests on high volume, usually on 'bad news'. This not only catches stops but shakes the market out as well. This process allow for higher prices. Testing is a sign of strength (as long as you have strength in the background]. Low volume or successful test tells you the market is ready to rise immediately, higher volume test usually tells you "yes I want to go up but buyers be very cautious, I may not be quite ready yet" and I may want to re-test this price area again at a later time.
Also on p116, he makes a distinction of something he calls 'Long Term Tests of Supply':
Frequently professionals will absorb heavy selling (must be a down day] if they have become bullish. If a rally then starts, professional money will want to know if all the selling had been absorbed at the lower level as they do not want selling dumped on them at higher prices. So they drive the market down to test the previous areas of selling. This principle is exactly the same as a short term test, but over a longer period of time. This test must be seen at the same price levels of old areas that had shown high volume in the first place. High volume always shows supply, in this case the professional money 'absorbed the selling. The market does not like supply. Because of this dislike, the market has been brought back down into the same area. To then see low volume is a clear indication the market is going up, there is no selling!
So, my understanding is that there are two types of tests:
Tests that stand-alone and show that the supply has dried up by having lower volume than the prior two candles
(Long Term) Tests that show supply has dried up when compared to background strength (ie: Stopping Volume/Selling Climax/WRB) and notnecessarily the prior two bars
I'm definitely open to feedback, especially for bars I,J,K which throw me for a loop:
Ignored
You've pretty much nailed it..
Bar G- Is really an important bar, is a ND on the highs and the next bar closes well below the lows of Bar G.
Bar I - This is strength, price tried to dip below the previous bar and failed to do so. This is an up bar, but with it rejecting the previous low and closing on the highs there is strength here. But you have to keep in mind Bar G, with Bar G behind us more than likely this strength doesn't mean much.
Bar J - J tries to rally above Bar I, but isn't able to do it. This bar in conjunction with Bar G is the nail in the coffin for the buyers.
Bar K - Bar K is a ND, this bar does reject the lows of the previous bar, but the weak close of this bar is the tell-tale sign that this is a ND.
In VSA a wide spread up bar like bar 1 would be seen as a sign of weakness. Widespread up bar, closing in the middle on climatic volume is weakness. *BUT* you want to see an up move behind weakness, well bar 1 doesn't have an up move behind it. But in VSA terms we still need to be cautious.
I do like bar 4 for a long, bar 4 came down into the close of the July 19th bar and drastically reduced volume, at the moment it doesn't seem like any sellers are around.
{quote} Malcolm has always been a little loose with VSA terminology, he's mentioned it before basically saying he doesn't get caught up with all of the names. From the post and my vague understanding of open ranges, when he says ultra high volume tests I suspect he is really saying shakeout. Shakeouts especially when they are at the end of an accumulation phase are easy money. A true shakeout is violent, larger spread and high volume, 9/10 times price breaks out of the accumulation area and starts the trend after a true shakeout. Going into what...
Ignored
I get what you mean mate, but on Malcolms screenshot his "test" bar neither has low volume, nor does it have high, or ultra high.
So basically Malcolm is saying his test bar can either have low volume, high volume ultra high volume.....or any kind of volume?
So to simplify it, he just looking for a pinbar/hammer on the 2nd test bar and the volume has no significance?
Also whilst the 1st test bar had twice the volume, it also had twice the spread, I cant really see an anomaly between the two, but im slightly digressing here as I was only looking at the test after the breakout
{quote} I get what you mean mate, but on Malcolms screenshot his "test" bar neither has low volume, nor does it have high, or ultra high. So basically Malcolm is saying his test bar can either have low volume, high volume ultra high volume.....or any kind of volume? So to simplify it, he just looking for a pinbar/hammer on the 2nd test bar and the volume has no significance? Also whilst the 1st test bar had twice the volume, it also had twice the spread, I cant really see an anomaly between the two, but im slightly digressing here as I was only...
Ignored
Yeah basically.
I haven't had a ton of interaction with Malcolm so its hard for me to speak for him. The impression I've gotten from reading his posts is that once he's figured out the background hes looking for any excuse to trade.
You said the first test bar, you mean bar 2? I don't get the significance on that bar either. What sticks out to me is bar 3, no professionals were willing to take price up as it broke out the highs of bar 1.
**EDIT**
You mean "failed test" in the MTM screenshot.. Yeah, honeslty I think when they showed the example they were really reaching for an failed test example.
Today positions on DAX. I saw SHAKE OUT, then confirmed TEST and i entry long, but they cutted me on sl... Reentry, the same SOS signals and i got out because they made UT SOW. {image}
Ignored
Nice job, huge improvement. Don't forget to study your wins as much as your losses.
{quote} Yeah basically. I haven't had a ton of interaction with Malcolm so its hard for me to speak for him. The impression I've gotten from reading his posts is that once he's figured out the background hes looking for any excuse to trade. You said the first test bar, you mean bar 2? I don't get the significance on that bar either. What sticks out to me is bar 3, no professionals were willing to take price up as it broke out the highs of bar 1. **EDIT** You mean "failed test" in the MTM screenshot.. Yeah, honeslty I think when they showed the example...
Ignored
Sorry mate, by first test bar I ment Bar 1, in comparison to Bar 3, I thought thats what you were comparing. (I forgot to even look at bar 2)
But yeah I see what you mean about any chance to jump in on the move, I dont reckon there was alot of VSA involved in this trade, although I could be wrong.
1.Higher TF trend, longs only.
2. 2bar reversal showing strength (this was the VSA part )
3. Break above OR high which lines up with trend
4. Pinbar entry from OR high ( or we can call this a test for VSA purposes)
But with the test/pinbar query aside, it looks like a pretty good semi-mechanical strategy to catch some trades at the open. Ive been marking them up and looks good.
**EDIT** You mean "failed test" in the MTM screenshot.. Yeah, honeslty I think when they showed the example they were really reaching for an failed test example.[/quote]
Yeah I was basically comparing Malcolms "High Volume Test" as a reason for entry, with Tom williams saying that High Volume tests are failures due to supply still being present.
But im assuming Malcolms entered on plenty of these bars to know that they work. (As long as background confirms)
{quote} You've pretty much nailed it.. Bar G- Is really an important bar, is a ND on the highs and the next bar closes well below the lows of Bar G. Bar I - This is strength, price tried to dip below the previous bar and failed to do so. This is an up bar, but with it rejecting the previous low and closing on the highs there is strength here. But you have to keep in mind Bar G, with Bar G behind us more than likely this strength doesn't mean much. Bar J - J tries to rally above Bar I, but isn't able to do it. This bar in conjunction with Bar G is...
Ignored
G - That makes sense. So this bar is reinforced by H as a stronger rejection. I definitely need to work on pinpointing important bars like G that don't have extreme volume I - I see J - Gotcha K - I see exactly what you mean. In retrospect, my brain still occasionally mistranslates into Candlestick instead of VSA lol. 1 - Yeah. I may have been coloring this bar bullish due to my personal bias. Didn't fully acknowledge the potential for climactic volume w/ no follow through
Thanks for the clarifications! The markets are down yet AAL is up, so it looks like supply did indeed dry up and buyers are coming in.
I was basically comparing Malcolms "High Volume Test" as a reason for entry, with Tom williams saying that High Volume tests are failures due to supply still being present
Ignored
The operative word from that screenshot is potential.
Although we tend to talk about Tests as coming on low volume (especially less than the previous two bars), Tests can come on high volume.
What we need to see in order to determine whether the Test passed or failed is whether the next bar (or the bar after the next in some cases) is UP. Where UP is defined as a close above the close of the Test bar.
Without VSA, you're playing checkers while the Smart Money plays chess.