1.The argument for opening trade:
#24232081 EUR/JPY 26.02.18 17:11
Attached Image (click to enlarge)
Attached Image (click to enlarge)
A - DIVERGENCE on H1 TF
B - Murrey Match lines -1/8 - Over Sold (Too low on enthusiasm) - - - - (Prices may never make it through this line) / based on the rule of 75% 1.Risk Reward ration 1:2 (Tp1) 2.Max: Risk-Reward Ration 1:4 (Tp2) 3.Volume per trade 2% 4.MANAGEMENT – We aim for Tp1 (1:2), at the same time we have also a divergence on H4, and since we are still in a downtrend we go just for a sure TP1 level of RRR 1:2
I rest my case based on the following argument, and let’s not forget that the market is not a bargaining chip, and I accept the risk of 2% out of the balance. The argument for opening the trade: #24327350 NZD/USD 27.02.18 10:59 M15
A – H4 SUPERTREND – DOWNTREND; H1 SUPERTREND – DOWNTREND We are going with the trend towards M15 (4/8) MM - pivot line The up divergence has been rejected at T1, by H1 SUPERTREND!
B – Hidden divergence on both M15, M30
Attached Image (click to enlarge)
Attached Image (click to enlarge)
1. Risk Reward Ration 1:2 (T1 – planning at that level to BE) and run for RRR1:3 2. Close trade at (Tp2) 3. Volume per trade 2% 4. MANAGEMENT – We aim for Tp2 (1:3). Once price gets at Tp1 – pivot line M15 (4/8) MM, we secure our trade by moving SL to BE
Outcome - trade #24327350 NZD/USD 27.02.18 10:59 M15 stopped out at BE by news
I rest my case based on the following argument, and let’s not forget that the market is not a bargaining chip, and I accept the risk of 2% out of the balance.
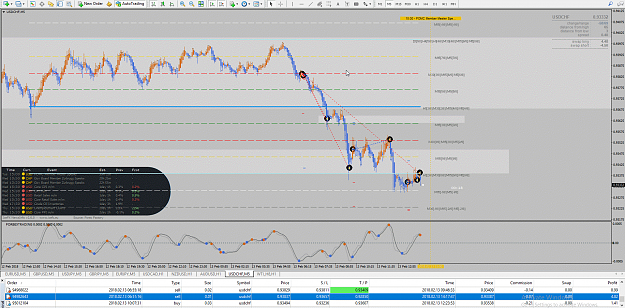
The argument for opening the trade: #24438754 EUR/USD 28.02.18 06:43 M15
A – PRICE STAL on M15 (1/8 MM) – Fast reverse line (weak) Weak, Stall and Reverse. This line is weak. If prices run down too far too fast, and if they stall at this line they will reverse up fast. If prices do not stall at this line they will move up to the 0/8 line.
B – Regular divergence
Attached Image (click to enlarge)
1. Risk Reward Ration 1:2 (T1 – planning at that level to BE) and to run for RRR1:2 2. Close trade at (Tp2) 3. Volume per trade 2% 4. MANAGEMENT – We target Tp2 (1:2). Once the price gets at Tp1 – (2/8) MM, we secure our trade by moving SL to BE.