Second, hats of to ubenders - who appears to have put 2 and 2 together and made 4 (which is quite a feat in this business). He may well have discovered a missing link for those of us who have been trading the Abonacci way.
So some rules (as it seems most threads need them).
1. Be respectful
That's about it - but I might add to that if it seems necessary.
So to the system. First let me say this is a work in progress, but based on proven and profitable systems. One reason for the thread is to refine it. BUT that does not mean refining by throwing every indicator you can imagine at it - the beauty of this system is the simplicity. It is more refining through observation we're looking for.
Charts
We only need two indicators
1. Abonacci indicator
2. Murrey Math (MM) indicator
Nothing else is needed. Really. No REALLY.
Chart setup (this is the most complicated bit, but once done everything is set)
1. Open a chart (timeframe doesn't really matter but I go for 1h or 4hr)
2. Apply template below.
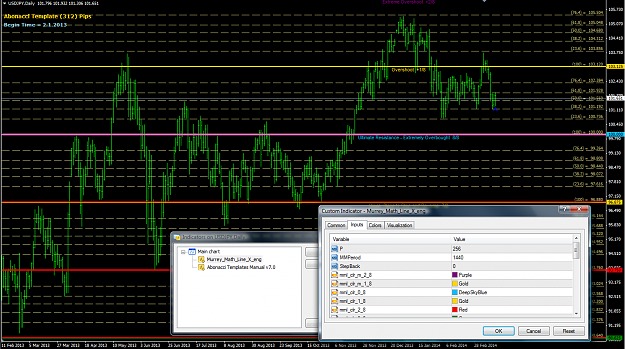
3. Open Murrey Math indcator and change to the following. 'P' to '256' and 'MMPeriod' to '1440'

4. Open Abonacci Template
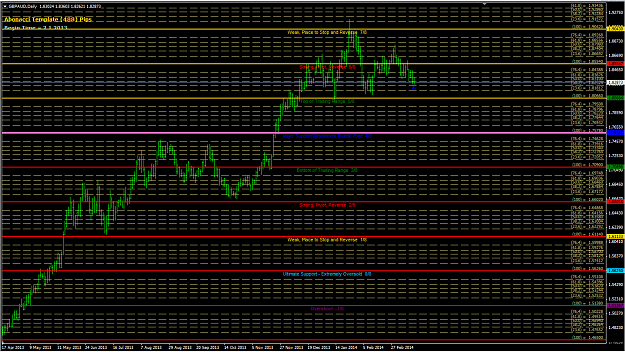
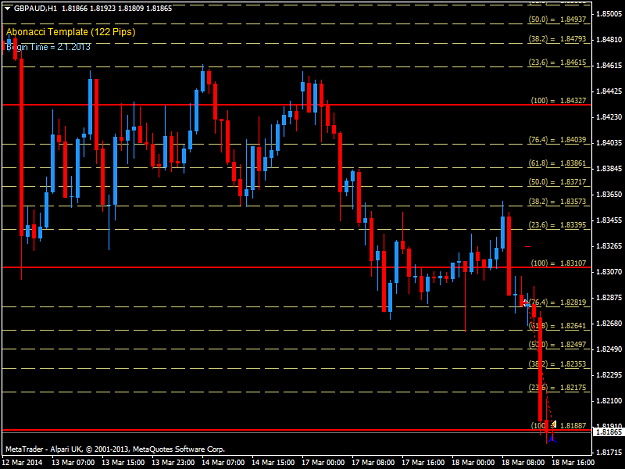
For pairs with price format x.xxxxx 'Length' 122 (1h TF trading) or 244 (4h TF trading) or 488 (Daily TF trading)
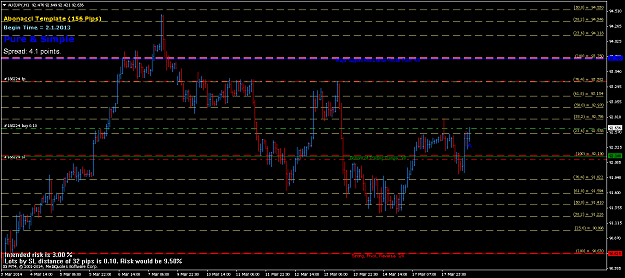
For pairs with price format xx.xxxx or xxx.xxx (usually yen pairs) change 'Length' to 156 (30m/1h TF trading) or 312 (4h TF trading) or 625 (Daily TF trading) and
5. Copy one of the Murrey Math levels (preferably the Support/Resistance Pivot Point level (blue)) into the 'Baseline box'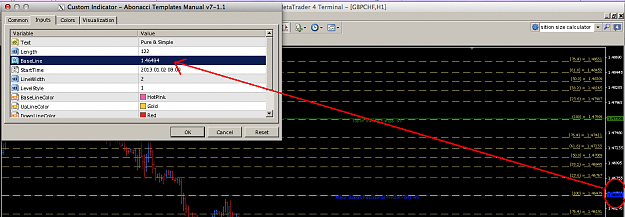
6. Your abonacci 100% levels should now line up with the MM levels.

Trading
Option 1.
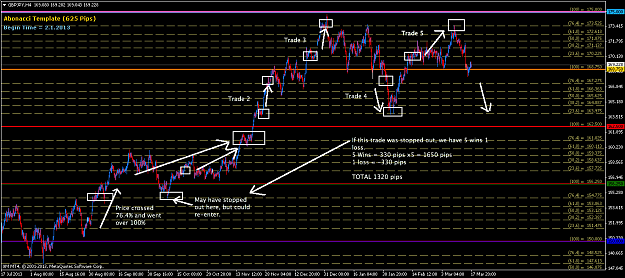
Long Trade - Price comes from 76.4% level rises above 0%/100% into the phase above. Enter long when price breaks the 23.6%. Take Profit is the 76.4% level.
Short Trade - Price comes from 23.6% level drops Below 0%/100% into the phase below. Enter short when price breaks the 76.4%. Take Profit is the 23.6% level.
You may want to move SL to BE and/or take a 1/3 off when price reaches 50%, and/or take another 1/3 off when price reaches 61.8% (long)/23.6% (short)
You will see that what we are aiming to do is take a slice out of the action when price is moving between levels.
Stop Loss
I suggest either
10 pips below (longs) or above (shorts) the 100% level
or
close and reverse your position at the 76.4% level in the phase below (longs), 23.6% level (shorts).
As with all systems, there will be losses. So the importance of finding the right money management to fit your trading style and risk tolerance cannot be over emphasised.
Examples
Option 2
Coming soon
Sizes and baselines for pairs (bolded numbers are a 1:1 fit. ie 1 phase of abonacci fits the exact distance between 2 Murrey Math levels)
GBP/USD
Size - 122, 244 or 488
Baseline - 1.5625
GBP/JPY
Size - 156, 312 or 625
Baseline - 150
GBP/AUD
Size - 122, 244 or 488
Baseline 1.95313
EUR/USD
Size - 122, 244 or 488
Baseline - 1.31836
EUR/AUD
Size - 122, 244 or 488
Baseline - 1.36719
USD/CHF
Size - 122, 244 or 488
Baseline - 0.92773
USD/JPY
Size - 156, 312 or 625
Baseline - 87.5
EUR/JPY
Size - 156, 312 or 625
Baseline - 125
AUD/NZD
Size - 122, 244 or 488
Baseline - 0.97656
USD/CAD
Size - 122, 244 or 488
Baseline - 1.02539
AUD/USD
Size - 122, 244 or 488
Baseline - 0.97656
AUD/JPY
Size - 156, 312 or 625
Baseline - 87.5
EUR/GBP
Size - 122, 244 or 488
Baseline - 0.83008
NZD/USD
Size - 122, 244 or 488
Baseline - 0.83008
GBP/CHF
Size - 122, 244 or 488
Baseline - 1.46484
NZD/JPY
Size - 156, 312 or 625
Baseline - 87.5
EUR/CAD
Size - 122, 244 or 488
Baseline - 1.36719
XAU/USD
Size - 3125, 6250
Baseline - 1500.00
Another approach worth exploring is calculating using a bigger size template (doesn’t matter how big as long as it matches the MM levels) and then build multiple entries (equity millipede) for swing trading.
As the thread develops (hopefully), I will add links or text from posts where members contribute refinements and developments.