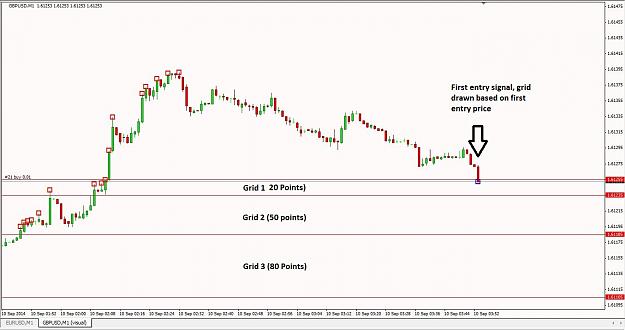
Let me try explain the grid, please refer to attached screenshot:
The grid itself consists of 3 distinct areas (please don't ask me to add more grids my brain won't cope ) The grid is drawn based on the first entry price received for each new cycle.
For a buy entry, the grid is draw below price, for a sell entry the grid is drawn above price.
For each grid area, the settings apply:
The grid itself consists of 3 distinct areas (please don't ask me to add more grids my brain won't cope
For a buy entry, the grid is draw below price, for a sell entry the grid is drawn above price.
For each grid area, the settings apply:
- Grid Size = Size in points/pips(4 digit) of the first, 2nd and 3rd grids respectively.
- Grid 1 Increment (Space between entries) = This is the minimum space in points/pips (4 digit) between entries. If an entry signal is less that this number in points from the last entry, no trade will be taken.
- Max Trades For Grid 1/2/3 = max number of trades in that grid. Price will need to move on to the next grid before more trades are taken.
- Grid 1/2/3 Lots = The lots applied to signal in that specific grid, when price moves into the next grid, the grid lots for that grid will now apply on new signals.
So you have 3 sets of settings, for each grid area.
Hope that makes sense? Let me know if you want me to explain something in more detail
Vlad
Attached Image (click to enlarge)